Reviews
Funtek Raid Adventure : A low-cost, Land Rover style RC car
 Removing the plastic caps under the front arms reveals the top shell mount points, similar to the original Mavic Pro
 There are 4 screws under the battery and a further 2 on the rear of the drone that hold the top of the Mavic 2 shell on
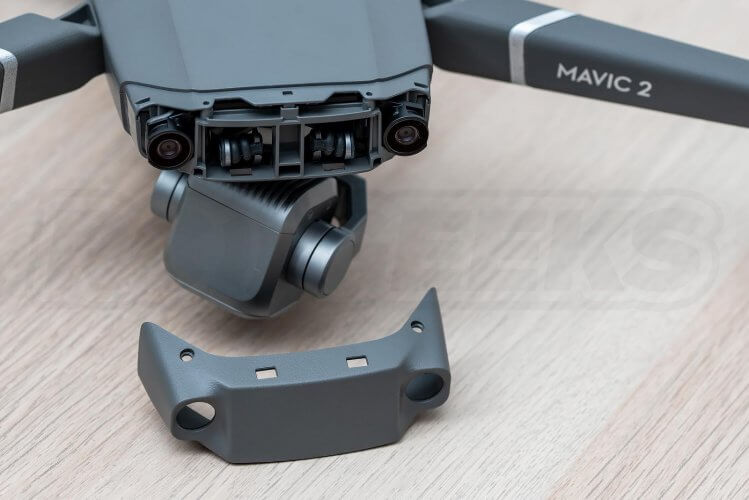
 We opted to remove the nose of the craft first as it overlaps with the top shell. It fits on the front of the drone tight and required some work to slide off. This reveals the front vision position sensors and the start of the gimbal mount.
 With the front removed the top lid was levered off
 The lid itself is different with windows for the upward vision positioning sensors
[gallery columns="2" size="medium" link="file" ids="https://cdn.shopify.com/s/files/1/0263/8469/5395/files/Mavic-2-Pro-Teardown-lid-detail-top.jpg|"]
The new side and upward vision positioning block is fixed together at the rear
 With the lid removed we can get a better look at the ESC/power board for the new 4S powertrain with battery connector and fan. You can see with the front mounted fan lifting hot air up from the processors on the mainboard below, the air flowing through the front intakes and out the rear of the craft.
 The top board is also visible with satellite positioning (GPS/GLONASS) receiver as seen below
[gallery columns="2" size="medium" link="file" ids="https://cdn.shopify.com/s/files/1/0263/8469/5395/files/Mavic-2-Pro-Teardown-satellite-positioning-top.jpg|"]
Removing two more screws on the underside of the craft allows removal of the air intake and allows the metal bottom shell to swing up. Interestingly this is not a heatsink part as per the original Mavic Pro. Removing the flex cable allows for its full removal from the craft.
[gallery columns="2" size="medium" link="file" ids="https://cdn.shopify.com/s/files/1/0263/8469/5395/files/Mavic-2-Pro-Teardown-lower-shell-components.jpg|"]
You can see the daughter-board attached to the inside and one ribbon cable connects this to the mainboard. We unscrew these components and lay them out.
 Along with the downward facing sensors this board also includes the landing light LEDs, bind switch and SD card slot.
[gallery size="medium" columns="2" link="file" ids="https://cdn.shopify.com/s/files/1/0263/8469/5395/files/Mavic-2-Pro-Teardown-sensor-daughterboard-bottom.jpg|"]
To remove the mainboard underneath we unlatched the 4 connector cables, the antenna, removed the black bridge lens mount for the front downward facing camera and undid the multiple screws holding the board down. The board with the fan then lifts out.
 The board itself has the two downward positioning sensors, the usb-c port and the majority of the processing units and more on the bottom, with the fan on top.
[gallery columns="2" size="medium" link="file" ids="https://cdn.shopify.com/s/files/1/0263/8469/5395/files/Mavic-2-Pro-Teardown-mainboard-removed-bottom.jpg|"]
At the rear of the craft the sensor module uses two screws to hold it to the chassis. It features sideways facing sensors, rear sensor and the upward ones. Its a neat little unit that sit upright in the frame out of the way of the battery.
[gallery columns="2" size="medium" link="file" ids="https://cdn.shopify.com/s/files/1/0263/8469/5395/files/Mavic-2-Pro-Teardown-rear-sensor-module-bottom.jpg|"]
Next we returned to the craft to remove the IMU and satellite sensor board which is screwed into the 'head' of the drone.
 The IMU is suspended a rubber damper to minimise vibrations from the motors.
[gallery size="medium" link="file" ids="https://cdn.shopify.com/s/files/1/0263/8469/5395/files/Mavic-2-Pro-Teardown-IMU-board-unraveled.jpg|"]
The front vision position sensors are held in the front of the craft with two screws and two ribbon cables, one for each sensor. Here is the familiar sensor board removed.

 The motor can be removed by unscrewing the three 2mm hex bolts that hold it onto the arm. It will need to be de-soldered from the power-board and then carefully pulled through the arm housing.

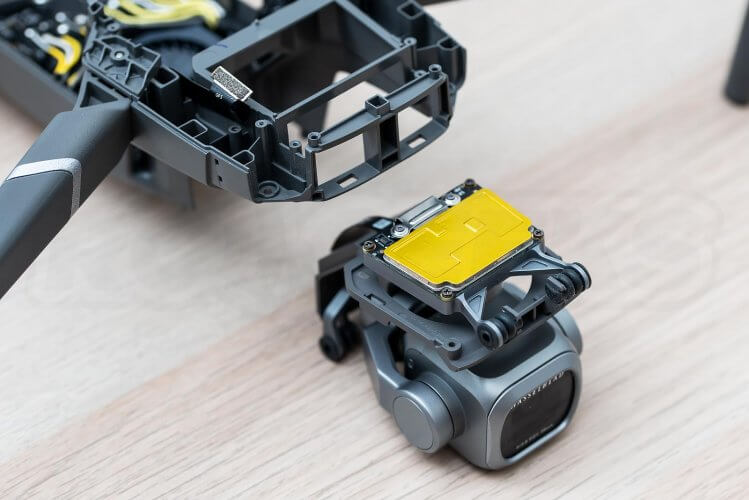
 Working from the bottom of the craft you would remove the air intake cap, disconnecting the gimbal flex cable from the leading edge of the board. From there only four screws prevent you from taking the entire gimbal/camera module out of the craft, with replacement the reversal of removal.
 And that concludes our DJI Mavic 2 Teardown. If you found this article interesting and would like to see others like it, check out the rest of our Teardown Series on our blog.
The Mavic 2 Pro and its brother the Mavic 2 Zoom are both available on our webstore, where you can learn more about either of them.
If you have any questions or would like anything clarified, feel free to drop us a message in the comments section below and we will do our best to get back to you.
And that concludes our DJI Mavic 2 Teardown. If you found this article interesting and would like to see others like it, check out the rest of our Teardown Series on our blog.
The Mavic 2 Pro and its brother the Mavic 2 Zoom are both available on our webstore, where you can learn more about either of them.
If you have any questions or would like anything clarified, feel free to drop us a message in the comments section below and we will do our best to get back to you.Written by
Tom Begglesworth